verschiedene stadien der verzweiflung *ggg*…
various stages of despair *ggg*…
so, nun hab ich heute mal das mieserable wetter genutzt und ein bisschen mit meinen transfers experimentiert.
ums vorweg zu nehmen: ich glaube, mein ding wird das nicht…
aber der reihe nach:
today i made the best (well…;) of the rainy weather and went on with my experiments concerning transfers.
to anticipate my decision: i don´t think that will really become my thing…
but step by step:
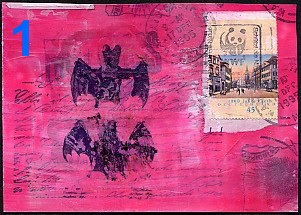
 versuch 1:
also – gelmedium auf die karte gestrichen und fledermausbild drauf. gerubbelt wie doof (fehler?) und vermutlich nicht lange genug gewartet (gute 5 minuten?)… als ich dann gemerkt habe, dass ich ganze teile der folie klumpig abrubble, aufgehört. na ja. da wusste ich noch nicht: es kann schlimmer kommen *g* – es lässt sich annähernd wenigstens als fledermäuse identifizieren.
experiment 1:
brushed gel medium onto card and layed bat-pic on top. scratched quite intensely (mistake i suppose) and i think i didn´t wait long enough (about 5 minutes?)… when i saw the pic comes down from the foil in cloggy pieces, i stopped. well, at this point i did not yet know it can come worse *g* – at least you can somehow identify these as bats…

versuch 2 und 3:
was ist das denn?? ich verrate es euch: es hätte ein basilisk werden sollen. unten ist er noch annähernd erkennbar, aber auch zu viel gerubbelt. – an diesem punkt beschloss ich: das gel-medium wird wohl nicht die richtige konsistenz haben. ich hab den großen pot ja schon länger, vermutlich ist es nicht mehr cremig genug. also ein bisschen was rausgenommen in ein kleines glas und wasser zugegeben. wird es helfen?…
exp. 2+3:
what is this?? i tell you: should be a basilisk. at pic no.3 you could guess it maybe, but too much scratching here again. – at this point i thought the gel medium might not have the right consistency (have it for a long time now and maybe it´s not wet enough any longer). took a small amout out of the pot and thinned it with water. will it help?

versuch 4:
das mittlerweile verdünnte gel benutzt. mit dem kopf der schildkröte wäre ich ja ganz zufrieden, aber eben nur mit dem kopf.
versuch 5:
ja, doch!! das sollte die gleiche schildkröte sein wie oben!!! nicht erraten??
exp. 4:
took the thinned gel. i´m content with the head of the turtle, but the rest…
exp. 5:
yes – same turtle as above!! you did not guess that??

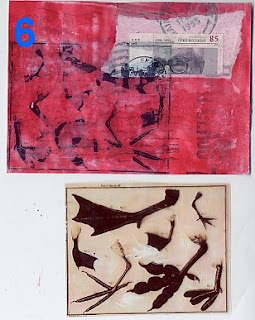
versuch 6:
hier hab ich mal die benutze folie dazu gelegt – kommt man ja sonst nie drauf, was das sein soll…
exp. 6:
here i added the transparency i used – to give you an idea what that was *supposed* to become…
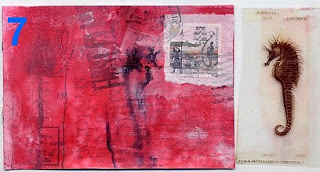
 versuch 7:
na, hättet ihr das seepferdchen gefunden?? aarrghhhh!! lag es daran, dass ich diesmal die folie mit gel bestrichen habe statt des papiers?
exp. 7:
did you find the seahorse?? arghhhhh!! was it a mistake to put the gel medium onto the transparency this time instead of onto paper??

versuch 8:
die fledermäuse noch mal. na jaaaa… diesmal hab ich mich gezwungen, ein bisschen länger zu warten (immer mal wieder getestet, ob die folie nicht anklebt). ob das der faktor ist, an dem es hakt? kann natürlich schon eine rolle spielen, ich bin grauenhaft ungeduldig!!
exp. 8:
again the bats from trial 1. well, this time i forced myself to wait a bit longer (with testings in between whether the foil wouldn´t stick to the paper). is that the criterion i make wrong? well, maybe, i´m terribly impatient!!!
fazit:
man soll ja nie “nie” sagen. vielleicht probier ich es ja noch mal. aber meine lieblingstechnik wird das wohl nicht…
andererseits: jetzt hab ich ein paar grundlagen für ein paar richtig grungy karten. kleb ich halt noch was drauf und schmier weiter *g* – verloren geb ich so schnell nichts. und ein paar von den folienbildern konnte ich auch noch so weit retten, dass sie als solche weiter verwendbar sind für andere zwecke…
conclusion:
never say “never”. i *might* give it another try some day… but i don´t think this will become my favorite technique…
on the other hand: i have some really grungy bases for cards now. just adding on some papers and smear on… – never waste something *g*! and i could save some of the transparencies (washed them) to use them on other pieces…

ohjeee du Arme. Also am besten geht es wenn du dir transparentes Papier kaufst. Dein Bildchen auf diesem Papier ausdruckst, gut trocknen lassen (dafür musst du nicht unbedingt einen Drucker mit Wasserfester Tinte haben) und dann dein Blatt oder Karte mit Malgel einstreichst, das ausgedruckte Bild drauf. Ein mal mit der Rolle drüber, kurz antrocknen lassen und das Papier abziehen. Fertig l.G. Xela
schade, jetzt wollte ich von dir was Neues lernen,
aber Rolle statt rubbeln ist sicher besser und etwas Geduld
LG ute
Oh, dear! I have as much success as you do with this method. My most successful transfer method uses what they call caulk in the US,but over here it is called bathroom/kitchen sealant and is the plasticy gunk used to seal leaks around sinks and baths and showers. The clear stuff is great value and works really well (it is a slower method, but I like it best). Email me if you want full details.
The beauty about our form of art, is these postcards can be rescued, just layer on more paper or paint and away you go!
I love your superb drying rack – brilliant idea!
Hugs,
kari x
http://www.inkytinker.typepad.com
Johanna those envies are the cutest! You can just ad more fun images and there you go: tru mail art! but think it’s a tricky and fun transfer method…
Thank you for reminding me to the Try it Tuesday blog. I tried this method too today and had (some) luck
Sehr interessanter Eintrag, endlich mal jemand, der auch seine Niederlagen zeigt. Das Thema “Transfer” hat wirklich wahnsinnig viel mit experimentieren zu tun. Aber ich habe zwei Dinge herausgefunden: inkjet Bild funktionieren gar nicht, weil alles verläuft. Auch zu dünnes Gel haut überhaut nicht hin. Ich verwende das Rubens Malgel seidenmatt (werde aber demnächst mal glanz probieren)
Ich nehm meine Kopie (oder Laserstrahldruck, irgendwas mit Toner), streich das komplett ein (Finger oder Spachtel) kleb es auf den Untergrund, lass es gut trocknen und rubbel dann auf der Rückseite mit meinen Fingern daran herum.
Das funktioniert eigentlich immer bestens, ausser wenn das Motiv zerrubbelt ist