tyvek beads / perlen aus tyvek

today i wanted to take advantage of the warm weather and work outside. so i made my first experiments on tyvek pearls.
some time ago i had ordered tyvek in 3 variations: white, gold coated and silver coated. i cut off some stripes (see pic, about 15 inch long) of the silver and gold and painted them with green (lumieres paints) and the others with red acrylic paint (cheaper brand).

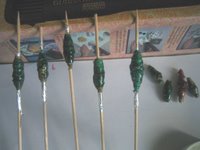
i wrapped some skewers with aluminium foil (must be broader than the stripes on the tall end, as this is to prevent sticking the material to the wood). around this zone i wrapped a painted tyvek stripe and glue down the tip of the stripe with gluestick.

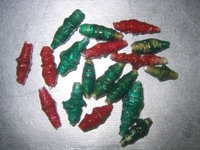
next is melting the tyvek with the heatgun. it shrinks a bit and then – still hot – i dipped it into UTEE and thus melted 2 or three layers onto the beads. so they look a bit like glass beads. let cool down.

then it was easy to draw the beads from the sticks. new embellishments in reserve now:)

wollte heute mal das schöne wetter ausnutzen und draußen werkeln. so machte ich meine ersten experimente mit perlen aus tyvek.
vor längerem schon hatte ich mir 3 sorten tyvek zulegt (von der quiltzauberei.de): weiß und gold bzw silber beschichtetes. ich schnitt ein paar streifen von dem goldenen und silbernen zu (spitz zulaufend siehe erstes foto, ca. 40 cm lang) und bemalte einen teil mit grünem lumiere und die anderen mit roten acrylics, die ich mir gestern bei tschibo geholt hatte.

ich wickelte alufolie um hölzerne schaschlikstäbchen (muss breiter sein als die breite seite der tyvekstreifen, da es als trennmaterial dient, damit das tyvek sich nachher noch vom hölzchen löst). darauf wickelte ich nun jeweils einen tyvekstreifen und klebte die spitze davon mit dem klebestift auf.

als nächstes hab ich dann das tyvek geschmolzen mit der heißluftpistole. es schrumpelt etwas zusammen und dann hab ich es – noch heiß – in UTEE getunkt, 2-3x, und das dann jeweils geschmolzen, so dass ein glasperleneffekt eintritt. dann abkühlen lassen.

schließlich konnte ich die perlen ganz einfach vom stäbchen ziehen und hab nun wieder eine neue sorte perlen auf vorrat:))

selfmade text-ribbons/ selbstgemachte textbänder

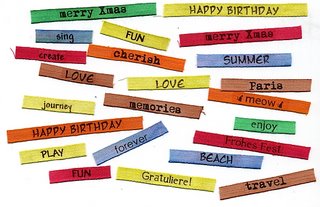
here you see some of my selfmade text-ribbons (i made much more). i colored white houshold-ribbons (available in various widths) with thinned dye-inks. then i computer-created text via “word” (various fonts used), printed it on t-shirt-transferpaper, cut out the single words and ironed them onto the ribbons. left some space left and right to fix them with eyelets or brads on cards, atcs, tags…
(ok, we have *only* 95 degrees fahrenheit these days. i *had* to do something with the electric iron;) i´m an aspirant for hell, i suppose…)


hab gestern und heute einen größeren vorrat (hier nur ein ausschnitt) an textbändern gemacht. erst weißes haushaltsband (gibts in verschiedenen breiten) mit stempelfarben bunt färben, trocknen lassen. in der zwischenzeit habe ich textbausteine (mittels “word” und verschiedenen fonts) auf t-shirt-folie gedruckt und diese dann ausgeschnitten und aufgebügelt (ich musste bei der hitze – wir haben derzeit so um die 32-35 grad celsius – ja unbedingt was mit bügeln machen;) bin wohl doch ein kandidat für die hölle..). links und rechts des textes ist ein stück frei, damit man die streifen mit eyelets oder brads an karten, atcs, tags etc befestigen kann.

colored tape


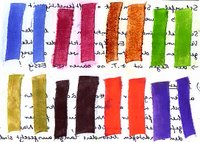
rainy day. good for experiments. — my elder son is playing volleyball and therefore needs lot of adhesive tape for his fingers;) he always wants to buy the colored kind – “way cooler”. i see. and it´s way cooler for me, too – as we all know there is nothing in the house you could not take for your art, hehe. fact is: colored tapes are very limited to buy (blue, red, green, yellow). but… WHITE is the hit!! today i tried if dye inks would be good to ink the tape. what can i say – they are PERFECT!! you can give the inkdrops directly onto the tape and brush, add some water for lighter colors, you can make a mix, running the colors into each other… just as you need it for your project!

here are my first strips: i teared white tape from the bobbin, fixed it on a sheet of transparency (sorted out from older school stuff) and started painting…
how cool is that?!